
基本照明プラン
Standard Lighting Plan- 表示価格は全て税抜きです。
全機材プラン
Rent-all Plan- 表示価格は全て税抜きです。
有償レンタル
Paid Rental- 表示価格は全て税抜きです。
背景布・ペーパー
Backdrops & Paper- 表示価格は全て税抜きです。
Standard Lighting Plan
基本照明プラン
~¥1,000 /h (excl. tax)
・プランご利用時に、機材を使用いただかなくとも課金対象となります。
・プラン以外の機材をご希望の場合、リスト上に表記されるレンタル料金(1回)が発生いたします。
・表記は消費税抜価格です。
・各種料金は予告なく変更する場合がございます。
Sony NP-F750
¥Free
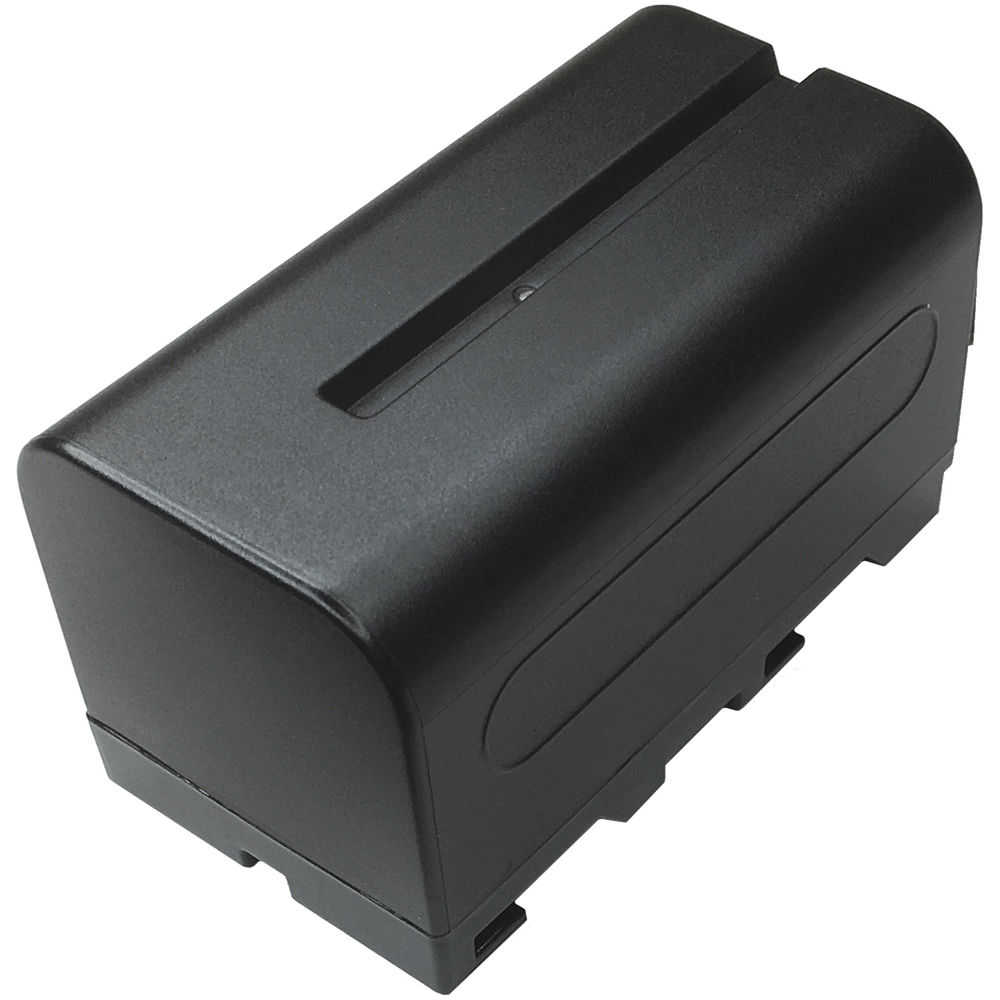
6 available
Rent-all Plan
全機材プラン
~¥3,500 /h (excl. tax)
・カメラ・レンズ、バッテリーは有償レンタルとなります。予めご了承ください。
・プランご利用時に、機材を使用いただかなくとも課金対象となります。
・プラン以外の機材をご希望の場合、リスト上に表記されるレンタル料金(1回)が発生いたします。
・表記は消費税抜価格です。
・各種料金は予告なく変更する場合がございます。
Sony NP-F750
¥Free
6 available
Paid Rental Equipment
有償レンタル機材
¥3,000~/day (excl. tax)
・機材を予約されますと、ご使用いただかなくとも課金対象となります。
・リスト上に表記されるレンタル料金(1回)が発生いたします。
・表記は消費税抜価格です。
・各種料金は予告なく変更する場合がございます。
Sony NP-F750
¥Free
6 available
Backdrops & Background Paper
背景布・ペーパー
¥4,000~/day (excl. tax)
・料金にはセットアップも含まれております。
・予約されますと、ご使用いただかなくとも課金対象となります。
・リスト上に表記されるレンタル料金(1回)が発生いたします。
・表記は消費税抜価格です。
・各種料金は予告なく変更する場合がございます。
Sony NP-F750
¥Free
6 available
How to use the Pholsy Universal Wireless Flash Trigger
Pholsyユニバーサルワイヤレスフラッシュトリガーの使用方法

¥500/day(税抜)
照明プランをお使いいただく際、フラッシュトリガーをお持ちでなければ、ワイヤレストリガーのご利用をお勧め致します。
ご利用の際にはスタッフまでお声がけ下さい。
If you do not have a flash trigger when using any studio lights, we recommend using a wireless trigger.
Please ask our staff if you wish to use this device.
Pholsyトランスミッターとカメラのセットアップ
- Pholsyトランスミッターをカメラのホットシューマウントにスライドさせます。
- ロックリングをきつくなるまで回してください。
- カメラ、トランスミッターの順に電源を入れ、撮影モードをマニュアルに設定します。
- トランスミッターがチャンネル1であることを確認します。
Pholsyトランスミッターでスタジオ照明のセットアップ
- すべての照明がチャンネル1にあることを確認してください。
- 次に、どのライトをメインまたは「マスター」ライトにするかを決定する必要があります。
- 次に、S1/S2 ボタンを1回押して、他のライトを「スレーブ」モードに設定します。(これは、選択した「マスター」ライトのタイミングに合わせて消灯することを意味します)。
- 3.5mmミニジャックを受信機のFLASHポートに接続し、オンになっていることを確認します。
- ミニジャックのもう一方の端を、「マスター」ライトの背面にあるSYNCポートに接続します。*接続したまま、受信機を背面からぶら下げることができます。
[注意】ポートに入らない場合は、間違ったケーブルを使用している可能性があります。ポーチの中に見当たらない場合は、スタッフにお尋ねください。
セットアップのテスト
両方の手順が完了したら、カメラに戻って送信機のTESTボタンを押してください。すべてのライトが同時に消灯するはずです。その後、通常通りカメラを使用することができるはずです。
上記の手順をすべて完了しても、ライトが同時に消灯しない場合は、スタッフにご相談ください。
Setup the camera with Pholsy Transmitter
- Slide the Pholsy transmitter into the camera’s hot shoe mount.
- Turn the locking ring until tight.
- Turn on the camera, then transmitter; set the shooting mode to Manual.
- Confirm that the transmitter is on Channel 1.
Setup the studio lights with Pholsy Transmitter
- Make sure that all lights are on Channel 1.
- Next you need to decide which will be the main or “master” light.
- Then set the other lights to “slave” mode by pressing the S1/S2 button once. (This means they will go off to the timing of the “master” light you selected.)
- Connect the 3.5 mm mini-jack into the FLASH port on the receiver and make sure it is on.
- Connect the other end of the mini-jack into the SYNC port on the back of the “master” light. *You can just let the receiver hang off the back while it’s connected.
[Keep in mind] If it’s not going in the port, you may be using the wrong cable. Check the pouch, it should be there. If not, please ask one of the staff.
Test the setup
After you’ve completed both steps, go back to your camera and hit the TEST button on the transmitter. All lights should go off at the same time. Then you should be able to use the camera like normal.
If you’ve completed all the steps above, and the lights are still not going off together, please ask one of our staff for further assistance.